In Visual Studio 2012 and WCF 4.5, there is a new option available to generate Task based operations so that the code from the client side can be then less complex. In the following example we will see how to implement it.

Showing posts with label WPF. Show all posts
Showing posts with label WPF. Show all posts
Task based WCF Services in .NET 4.5
Task based asynchronous programming is now simplified and streamlined in .NET 4.5 through the use of keywords ‘await’ and ‘async’. These keywords help makes asynchronous code look similar to synchronous coding, making it easier to write and understand Asynchronous code. Those who have used WCF service might have used the Asynchronous contract generation while adding WCF service reference in the Client application. The Asynchronous contracts are required so that client can make an Asynchronous call to WCF service performing time consuming operations.
In Visual Studio 2012 and WCF 4.5, there is a new option available to generate Task based operations so that the code from the client side can be then less complex. In the following example we will see how to implement it.
In Visual Studio 2012 and WCF 4.5, there is a new option available to generate Task based operations so that the code from the client side can be then less complex. In the following example we will see how to implement it.

Free Chart Control for WinForms, WPF and ASP.NET
Nevron has released a Lite edition of Nevron Chart for .NET as Community edition and they are providing licenses for it absolutely free of charge. Some supported charting types and other features of their chart controls are listed over here: https://www.nevron.com/products-dot-net-chart-free-control.aspx
Since the Community edition is part of the Nevron Chart control, it also relies on licenses (free of charge). They are providing 3 types of licenses –
You can acquire the free license by following these steps:
1. Register a Nevron.com account and activate it
2. Download the Nevron Vision for .NET installation. They are providing 5 separate installations for the different versions of Visual Studio and the .NET Framework
3. Once you install the Vision suite on your development machine, run the Nevron License Key Manager and obtain the machine ID (located in the key manager window title)
4. Send them your development machine ID via email
Nevron will reply back once the account is updated and the corresponding licenses are available.
I think overall if you are a developer who needs a free chart control for your .NET apps, this is as good as it gets. Get your free license here
Since the Community edition is part of the Nevron Chart control, it also relies on licenses (free of charge). They are providing 3 types of licenses –
- Desktop (required for redistribution of your compiled desktop app),
- Developer (for your development machine) and
- Server (required for web application deployment)
You can acquire the free license by following these steps:
1. Register a Nevron.com account and activate it
2. Download the Nevron Vision for .NET installation. They are providing 5 separate installations for the different versions of Visual Studio and the .NET Framework
3. Once you install the Vision suite on your development machine, run the Nevron License Key Manager and obtain the machine ID (located in the key manager window title)
4. Send them your development machine ID via email
Nevron will reply back once the account is updated and the corresponding licenses are available.
I think overall if you are a developer who needs a free chart control for your .NET apps, this is as good as it gets. Get your free license here
WPF 4: Style ListBox Items using ItemContainer Style
Recently I was asked a question about the default styles for WPF ListBoxItems and how to change the Style for the a Selected ListBox Item. This article has the solution to both the queries.
When data is bound to a WPF List Box, the List Items gets generated automatically and it becomes a bit clumsy to apply any style on the individual items in the ListBox. In such scenarios, we can implement the ItemContainerStyle property. Once this property is set, the style applied is set for every item in the ListBox when it is created.
In the code shown below, I have explained how an ItemContainerStyle can be applied. I have created a WPF application and added the following class in it:

The XAML code shown below defines the ItemContainerStyle for the ListBox:


Now run the application and the following result will be displayed:

and move the mouse cursor over each ListBoxItem, the following result will be displayed

The ItemContainerStyle provides a mechanism for applying styles formatting on individual WPF ListBox items.
WPF 4: Change Hyperlink Text and URL using DataBinding
Let us assume we want to create a WPF UI with a ListBox containing list of web sites. This ListBox must contain Hyperlinks and it should be possible to change the Text and URL of these hyperlinks dynamically. Thankfully in WPF, we have the Hyperlink control element which can be clicked and the user navigated to a URL. But what if the end-user wants to reuse the same Hyperlink to navigate to different web sites? Here DataBinding helps to dynamically change the hyperlink element with its text and the navigate URL. The code shown below explains the same mechanism.
Step 1: Open VS2010 and create a WPF application, name it as ‘WPF4_Hyperlink_DataBinding’. In this application, add following classes. These class will be used for information about web sites to be visited:

Step 2: In this task, we will do the following:
- Create an instance of the above Information class in the MainWindow.xaml using Window Resources.
- Define the DataTemplate which will contain Grid with two columns, these columns will contain TextBlocks bound with the HyperText and NavigateUri property of the Information class.
- The xaml contains ListBox for displaying the data from the information collection class.
- The Hyperlink element is contained by the TextBlock. This TextBlock is bound with the SelectedItem property of the ListBox. Once the user selects the Item from the ListBox, using Bindable Run feature of WPF, the HyperLinkText property from the class is bound with Hyperlink element and the NavigateUri property of the Hyperlink element is bound with the NavigateUri property from the source class.
- The WebBrowser element will display the web site when the user clicks on the HyperLink element.

Task 3: Run the Application the result will be as below:

Click on the Hyperlink and the following result will be displayed:

Conclusion: With the Bindable Run property, data binding with the Hyperlink element can be possible in WPF.
Download the source code
WPF 4: Using DataGrid Context-Menu for Performing Insertion and Deletion Operations
In most cases, when you develop WPF UI application with the DataGrid control, end-users demand Excel like features with various shortcuts for performing Insert and Delete operations. The WPF DataGrid Context Menu helps us to develop similar kind of UI applications. In the code snippet given below, I have explained the same.
Step 1: Open VS2010 and create a WPF application, name it as
‘WPF4.0_DataGrid_Rows_Management’. In this project add the class file with following classes:
/// <summary>
/// The Entity Class
/// </summary>
public class Employee
{
public int EmpNo { get; set; }
public string EmpName { get; set; }
public int Salary { get; set; }
public string Designation { get; set; }
}
/// <summary>
/// The Model Class
/// </summary>
public class EmployeeCollection : ObservableCollection<Employee>
{
public EmployeeCollection()
{
Add(new Employee() { EmpNo = 101, EmpName = "Yudhistir",
Designation = "KING", Salary = 2000000 });
Add(new Employee() { EmpNo = 102, EmpName = "Bheem",
Designation = "KOSHDHIKARI", Salary = 1500000 });
Add(new Employee() { EmpNo = 103, EmpName = "Arjun",
Designation = "SUPREME COMMANDOR", Salary = 1200000 });
Add(new Employee() { EmpNo = 104, EmpName = "Sahdev",
Designation = "CHIEF COMMANDOR", Salary = 1000000 });
Add(new Employee() { EmpNo = 105, EmpName = "Nakul",
Designation = "CHIEF MEDICAL OFFICER", Salary = 1000000 });
Add(new Employee() { EmpNo = 106, EmpName = "Krishna",
Designation = "CHIEF STRATEGY ADVISOR", Salary = 8000000 });
Add(new Employee() { EmpNo = 107, EmpName = "Dustdyumna",
Designation = "MILITARY CHIEF", Salary = 1000000 });
Add(new Employee() { EmpNo = 108, EmpName = "Abhmanyu",
Designation = "Lt. GENERAL", Salary = 1000000 });
}
}
The above classes define Entity and Collection class for Employee.
Step 2: In the same project, add a new class for performing the DML operations as below:
/// <summary>
/// The Class is used for Data Manipulation
/// </summary>
public class DataOperations
{
EmployeeCollection Employees;
public DataOperations()
{
Employees = new EmployeeCollection();
}
public EmployeeCollection InsertRecord(int Index)
{
Employees.Insert(Index+1, new Employee());
return Employees;
}
public EmployeeCollection DeleteRecord(int Index)
{
Employees.RemoveAt(Index);
return Employees;
}
}
The above class performs Insert and Delete operation on the Employee collection.
Step 3: In the same project, add a Command and ViewModel class. The command class defines command for Performing Insert and Delete command. The command class implements ICommand interface. This command object is bound with the UI for performing operation. The ViewModel class define properties used for DataBinding with UI. The code is as below:
public class ViewModel : INotifyPropertyChanged
{
RelayCommand _InsertCommand, _DeleteCommand;
public RelayCommand DeleteCommand
{
get { return _DeleteCommand; }
set { _DeleteCommand = value; }
}
public RelayCommand InsertCommand
{
get { return _InsertCommand; }
set { _InsertCommand = value; }
}
DataOperations objDML;
public ViewModel()
{
objDML = new DataOperations();
InsertCommand = new RelayCommand(Res =>
Employees= objDML.InsertRecord(RecordIndex));
DeleteCommand = new RelayCommand(Res =>
Employees = objDML.DeleteRecord(RecordIndex));
}
public event PropertyChangedEventHandler PropertyChanged;
private void OnPropertyChanged(string pName)
{
if (PropertyChanged != null)
{
PropertyChanged(this,
new PropertyChangedEventArgs(pName) );
}
}
int _RecordIndex;
public int RecordIndex
{
get { return _RecordIndex; }
set
{
_RecordIndex = value;
OnPropertyChanged("RecordIndex");
}
}
EmployeeCollection _Employees = new EmployeeCollection();
public EmployeeCollection Employees
{
get { return _Employees; }
set
{
_Employees = value;
OnPropertyChanged("Employees");
}
}
}
/// <summary>
/// The Command Class
/// </summary>
public class RelayCommand : ICommand
{
public Action<object> actionToExecute;
public RelayCommand(Action<object> action)
{
actionToExecute = action;
}
public bool CanExecute(object parameter)
{
return true;
}
public event EventHandler CanExecuteChanged;
public void Execute(object parameter)
{
actionToExecute(parameter);
}
}
Step 4: Open the MainWindow.Xaml and write the following XAML code with DataBinding:
<Window x:Class="WPF4._0_DataGrid_Rows_Management.MainWindow"
xmlns=http://schemas.microsoft.com/winfx/2006/xaml/presentation”
xmlns:x=http://schemas.microsoft.com/winfx/2006/xaml”
Title="MainWindow" Height="350" Width="742"
xmlns:data="clr-namespace:WPF4._0_DataGrid_Rows_Management">
<Window.Resources>
<data:ViewModel x:Key="EmpVM"></data:ViewModel>
</Window.Resources>
<Grid DataContext="{Binding Source={StaticResource EmpVM}}">
<DataGrid AutoGenerateColumns="False" Height="287"
HorizontalAlignment="Left" Margin="23,12,0,0"
Name="dgEmp" VerticalAlignment="Top" Width="657"
ItemsSource="{Binding Path=Employees}" ColumnWidth="*"
SelectedIndex="{Binding Path=RecordIndex,Mode=TwoWay}">
<DataGrid.Columns>
<DataGridTextColumn Header="EmpNo" Binding="{Binding EmpNo}" />
<DataGridTextColumn Header="EmpName" Binding="{Binding EmpName}" />
<DataGridTextColumn Header="Salary" Binding="{Binding Salary}" />
<DataGridTextColumn Header="Designation" Binding="{Binding Designation}" />
</DataGrid.Columns>
<DataGrid.ContextMenu>
<ContextMenu>
<MenuItem Command="{Binding InsertCommand}"
CommandParameter="{Binding RecordIndex}" Header="Insert"/>
<MenuItem Command="{Binding DeleteCommand}"
CommandParameter="{Binding RecordIndex}" Header="Delete"/>
</ContextMenu>
</DataGrid.ContextMenu>
</DataGrid>
</Grid>
</Window>
The above XAML code defines the Context Menu for Insert and Delete operation. It contains Menu-Item for Insert and Delete. InsertCommand and DeleteCommand are bind with the Command property of the Menu-Item. Since for Insert and Delete operations the Index for the record to be deleted and insert position is required the CommandParameter is bind with the RecordIndex property declared in the ViewModel class.
Step 5: Run the application and right-click on the DataGrid row. You will get a context menu as shown below:

After selecting the ‘Insert’ menu the result will be as below:

A new row is added.
Select any row to be deleted by right clicking on the DataGrid row. The result will be as below: For e.g. I am selecting Record 104 to be deleted

WPF 4: Using Input Bindings to Go Mouseless
While creating the UI of an application, we need to adopt techniques that makes the user comfortable with the app. If the existing user is habitual of using shortcut keys for various operations, then while developing the new user interface, it is necessary for the UI developer to provide a similar functionality. In WPF, we have such a facility using ‘InputBindings’. Using this feature, operational shortcut facility can be provided. InputBindings in WPF can be provided on any element. The InputBinding contains KeyBinding which this is used to configure Command based upon keyboard keys and modifiers e.g. Control etc. and also MouseBinding for mouse actions. Typically this approach is used for MVVM based applications.
For this application have used the following Table:

Step 1: Open VS2010 and create a WPF Application and name it as ‘WPF4_InptuBinding’. To this project, add a class file and call it ‘DataClasses.cs’. Add the following code to it:
using System;
using System.Collections.ObjectModel;
using System.Data.SqlClient;
namespace WPF4_InptuBinding
{
public class EmployeeInfo
{
public int EmpNo { get; set; }
public string EmpName { get; set; }
public int Salary { get; set; }
public string DeptName { get; set; }
public string Designation { get; set; }
}
public class EmployeeInfoDAL
{
SqlConnection Conn;
SqlCommand Cmd;
public EmployeeInfoDAL()
{
Conn = new SqlConnection("Data Source=.;" +
"Initial Catalog=Company;Integrated Security=SSPI");
}
public ObservableCollection<EmployeeInfo> GetEmployees()
{
ObservableCollection<EmployeeInfo> EmpCollection =
new ObservableCollection<EmployeeInfo>();
Conn.Open();
Cmd = new SqlCommand();
Cmd.Connection = Conn;
Cmd.CommandText = "Select * from EmployeeInfo";
SqlDataReader Reader = Cmd.ExecuteReader();
while (Reader.Read())
{
EmpCollection.Add(new EmployeeInfo()
{
EmpNo = Convert.ToInt32(Reader["EmpNo"]),
EmpName = Reader["EmpName"].ToString(),
Salary = Convert.ToInt32(Reader["Salary"]),
DeptName = Reader["DeptName"].ToString(),
Designation = Reader["Designation"].ToString()
});
}
Reader.Close();
Conn.Close();
return EmpCollection;
}
public EmployeeInfo NewEmployess()
{
return new EmployeeInfo();
}
private int GetLastEmpNo()
{
int EmpNo = 0;
Conn.Open();
Cmd = new SqlCommand();
Cmd.Connection = Conn;
Cmd.CommandText = "Select max(EmpNo) from EmployeeInfo";
EmpNo = Convert.ToInt32(Cmd.ExecuteScalar());
Conn.Close();
return EmpNo;
}
public int InsertEmployee(EmployeeInfo objEmpInfo)
{
Conn.Open();
Cmd = new SqlCommand();
Cmd.Connection = Conn;
Cmd.CommandText =
"Insert into EmployeeInfo (EmpName,Salary,DeptName,Designation)" +
"values(@EmpName,@Salary,@DeptName,@Designation)";
Cmd.Parameters.AddWithValue("@EmpName", objEmpInfo.EmpName);
Cmd.Parameters.AddWithValue("@Salary", objEmpInfo.Salary);
Cmd.Parameters.AddWithValue("@DeptName", objEmpInfo.DeptName);
Cmd.Parameters.AddWithValue("@Designation", objEmpInfo.Designation);
Cmd.ExecuteNonQuery();
Conn.Close();
int EmpNo = GetLastEmpNo();
return EmpNo;
}
}
}
The EmployeeInfoDAL class defines methods for Insert operation in the database table.
Step 2: Now we need to define Commanding layer for the application. This class defines an Action<T> delegate which corresponds to the command subscribed on the UI elements using InputBindings. We also need to define the model class which will define public properties used for UI databinding. The model class also defines public read-only ICommand properties which are configured with the KeyBinding on UI for shortcut keys. The code for the classes is as below:
using System;
using System.Windows.Input;
using System.ComponentModel;
using System.Collections.ObjectModel;
using System.Windows;

namespace WPF4_InptuBinding
{
/// <summary>
/// The class used to define source for the InputCommand Bindings
/// on UI Elements like Button
/// </summary>
public class ApplicationModel : INotifyPropertyChanged
{
EmployeeInfoDAL objDal;
public ApplicationModel()
{
objDal = new EmployeeInfoDAL();
}

EmployeeInfo _ObjEmpInfo = new EmployeeInfo();
ObservableCollection<EmployeeInfo> _Employees;

public ObservableCollection<EmployeeInfo> Employees
{
get { return _Employees = objDal.GetEmployees(); }

}

public EmployeeInfo ObjEmpInfo
{
get { return _ObjEmpInfo; }
set
{
_ObjEmpInfo = value;
OnPropertyChanged("ObjEmpInfo");
}
}

int _EmpNo;

public int EmpNo
{
get { return _EmpNo; }
set
{
_EmpNo = value;
OnPropertyChanged("EmpNo");
}
}

public event PropertyChangedEventHandler PropertyChanged;
private void OnPropertyChanged(string pName)
{
if (PropertyChanged != null)
{
PropertyChanged(this, new PropertyChangedEventArgs(pName));
}
}

private ICommand _SaveRecordBinding;

public ICommand SaveRecordBinding
{
get
{
this._SaveRecordBinding = this._SaveRecordBinding ??
new ActionCommand(res => EmpNo =
objDal.InsertEmployee(ObjEmpInfo));
return this._SaveRecordBinding;
}
}

private ICommand _NewRecordBinding;

public ICommand NewRecordBinding
{
get
{
this._NewRecordBinding = this._NewRecordBinding ??
new ActionCommand(res => ObjEmpInfo =
objDal.NewEmployess());

return this._NewRecordBinding;
}
}

}

/// <summary>
/// The class used to define the Command which is
///further bound with the UI Elements
/// </summary>
public class ActionCommand : ICommand
{
Action<object> ExecuteCommand;

public ActionCommand(Action<object> executeCommand)
{
ExecuteCommand = executeCommand;
}

public bool CanExecute(object parameter)
{
return true;
}

public event EventHandler CanExecuteChanged;

public void Execute(object parameter)
{
try
{
if (parameter == null)
{
MessageBox.Show("Please enter values");
}
else
{
ExecuteCommand(parameter);
}
}
catch (Exception ex)
{
MessageBox.Show("Error occured!!!Please make all entry");
}
}
}
}
Step 3: Open MainWindow.xaml and write the following Xaml:
<Window x:Class="WPF4_InptuBinding.MainWindow"
xmlns=http://schemas.microsoft.com/winfx/2006/xaml/presentation”
xmlns:x=http://schemas.microsoft.com/winfx/2006/xaml”
xmlns:src="clr-namespace:WPF4_InptuBinding"
Title="MainWindow" Height="530" Width="876">
<Window.Resources>
<src:ApplicationModel x:Key="AppModel"></src:ApplicationModel>
</Window.Resources>
<Window.InputBindings>
<KeyBinding Command="{Binding ElementName=MainGrid,
Path=DataContext.SaveRecordBinding}"
CommandParameter="{Binding ElementName=MainGrid,
Path=DataContext.ObjEmpInfo,Mode=TwoWay}"
Key="S"
Modifiers="Control"></KeyBinding>
<KeyBinding Command="{Binding ElementName=MainGrid,
Path=DataContext.NewRecordBinding}"
CommandParameter="{Binding ElementName=MainGrid,
Path=DataContext.ObjEmpInfo,Mode=TwoWay}"
Key="N"
Modifiers="Control"></KeyBinding>
</Window.InputBindings>
<Grid DataContext="{Binding Source={StaticResource AppModel}}" Name="MainGrid">
<Grid.ColumnDefinitions>
<ColumnDefinition Width="432*" />
<ColumnDefinition Width="422*" />
</Grid.ColumnDefinitions>
<Grid Height="467" HorizontalAlignment="Left" Margin="12,12,0,0" Name="grid1"
VerticalAlignment="Top" Width="412"
DataContext="{Binding Path=ObjEmpInfo,Mode=TwoWay}">
<Grid.RowDefinitions>
<RowDefinition Height="42*" />
<RowDefinition Height="40*" />
<RowDefinition Height="40*" />
<RowDefinition Height="44*" />
<RowDefinition Height="44*" />
<RowDefinition Height="257*" />
</Grid.RowDefinitions>
<Grid.ColumnDefinitions>
<ColumnDefinition Width="202*" />
<ColumnDefinition Width="210*" />
</Grid.ColumnDefinitions>
<TextBlock Name="textBlock1" Text="EmpNo:" />
<TextBlock Grid.Row="1" Name="textBlock2" Text="EmpName:" />
<TextBlock Grid.Row="2" Name="textBlock3" Text="Salary:" />
<TextBlock Grid.Row="3" Name="textBlock4" Text="DeptName:" />
<TextBlock Grid.Row="4" Name="textBlock5" Text="Deisgnation:" />
<TextBox Grid.Column="1" Name="txteno"
Text="{Binding ElementName=MainGrid,Path=DataContext.EmpNo,Mode=TwoWay}" IsEnabled="False" />
<TextBox Grid.Column="1" Grid.Row="1" Name="txtename" Text="{Binding EmpName,Mode=TwoWay}"/>
<TextBox Grid.Column="1" Grid.Row="2" Name="txtsal" Text="{Binding Salary,Mode=TwoWay}"/>
<TextBox Grid.Column="1" Grid.Row="3" Name="txtdname" Text="{Binding DeptName,Mode=TwoWay}"/>
<TextBox Grid.Column="1" Grid.Row="4" Name="txtdesignation" Text="{Binding Designation,Mode=TwoWay}">
</TextBox>
<Button Content="New" Grid.Row="5" Height="31" HorizontalAlignment="Left"
Margin="6,21,0,0" Name="btnNew" VerticalAlignment="Top" Width="153"
Command="{Binding ElementName=MainGrid,Path=DataContext.NewRecordBinding}"
CommandParameter="{Binding ElementName=MainGrid,Path=DataContext.ObjEmpInfo,Mode=TwoWay}"/>
<Button Content="Save" Height="31" HorizontalAlignment="Left"
Margin="26,21,0,0" Name="btnSave" VerticalAlignment="Top"
Width="153" Grid.Column="1" Grid.Row="5" Command="{Binding ElementName=MainGrid,
Path=DataContext.SaveRecordBinding}"
CommandParameter="{Binding ElementName=MainGrid,Path=DataContext.ObjEmpInfo,Mode=TwoWay}">
</Button>
<TextBlock Grid.Row="5" Height="32" HorizontalAlignment="Left"
Margin="11,66,0,0" Name="textBlock6" Text="Press 'Ctrl+S' to Save the Record"
VerticalAlignment="Top" Grid.Column="1" Width="180"
FontWeight="SemiBold" />
<TextBlock Height="55" HorizontalAlignment="Left" Margin="6,66,0,0"
Name="textBlock7" Text="Press 'Ctrl+N' for New Record Entry"
VerticalAlignment="Top" Width="180" Grid.Row="5"
TextWrapping="Wrap" FontWeight="SemiBold" />
</Grid>
</Grid>
</Window>
The above Xaml code has the following:
- The model class is instantiated in the Windows Resources.
- In the InputBindings of the Window, KeyBindings are defined for the related command properties defined in the Model class. This also defines shortcut key for executing the specific command on the model class using ‘S’ for Save and ‘N’ new operations, to which model class is making call using the Command properties.
- Buttons present in the XAML are also set with the Command properties defined in the model class. This facility is provided for both type of users who are comfortable with Buttons and use Short-cut keys.
Step 4: Run the application and test it using the Shortcut keys.
After running the application enter values, tab out of the Designation TextBox and press ‘Ctrl+S’. The following result will be displayed and the EmpNo Textbox will show the EmpNo generated after insert operation completed. (EmpNo is auto-generated in Database table)

After pressing ‘Ctrl+N’, the following result will be displayed:

The first Textbox shows the last record added.
WPF: Binding XML Data to UI Elements
In this article, we will see how to bind XML data to WPF UI Elements. In this demonstration, I will try to show you a simple Master-Detail sample. I have used the following WPF controls in this example –
1) DataGrid.
2) TextBox.
3) Image.
So let’s add a XML file to our WPF project and call it ‘Customers.xml’. Now add some dummy data as shown below –
For this demonstration, I have added a folder called ‘Images’ in the WPF project, with a few sample images. Now let’s add a XML data source in our XAML code, which will fetch the data from our XML file ‘Customers.xml’ as shown below –

If you observe, the DataGrid property ‘IsSynchronizedWithCurrentItem’ is set to true. This means, when we make a choice of the DataGrid row, the corresponding item will be shown below as a details view in the TextBox control. It will also show an image of the product in an Image control.
Now when you run the project and select any row of the DataGrid, the output will look similar to the following –

1) DataGrid.
2) TextBox.
3) Image.
So let’s add a XML file to our WPF project and call it ‘Customers.xml’. Now add some dummy data as shown below –
<?xml version="1.0" encoding="utf-8" ?>
<Customers>
<Customer CustomerID="98886" Name="Pravinkumar R. D." City="Pune">
<OrderNo>100</OrderNo>
<ProductName>Samsung Monitor</ProductName>
<Picture>Images/samsungmonitor.jpg</Picture>
<Price>$1200</Price>
</Customer>
<Customer CustomerID="98887" Name="Alisha C." City="Mumbai">
<OrderNo>200</OrderNo>
<ProductName>Samsung LCD</ProductName>
<Picture>Images/samsunglcd.jpg</Picture>
<Price>$12400</Price>
</Customer>
<Customer CustomerID="98888" Name="Yash D." City="Delhi">
<OrderNo>300</OrderNo>
<ProductName>Samsung iPAD</ProductName>
<Picture>Images/SamsungTab.jpg</Picture>
<Price>$120</Price>
</Customer>
<Customer CustomerID="98889" Name="Mahesh S." City="Mumbai">
<OrderNo>400</OrderNo>
<ProductName>Samsung Laptop</ProductName>
<Picture>Images/samsunglaptop.jpg</Picture>
<Price>$1500</Price>
</Customer>
</Customers>
For this demonstration, I have added a folder called ‘Images’ in the WPF project, with a few sample images. Now let’s add a XML data source in our XAML code, which will fetch the data from our XML file ‘Customers.xml’ as shown below –
After this step, let’s design the main UI which will display all the customers in a Datagrid control. When we choose a specific customer by selecting a DataGrid row, it will show the detailed order for that customer. For this let’s add some XAML code as shown below –
<Grid.RowDefinitions>
<RowDefinition Height="130*" />
<RowDefinition Height="181*" />
</Grid.RowDefinitions>

<DataGrid x:Name="dataGrid1" Margin="8,8,8,0"
AutoGenerateColumns="False" ItemsSource="{Binding}"
Height="114" VerticalAlignment="Top"
IsSynchronizedWithCurrentItem="True" Grid.Row="0">
<DataGrid.Columns>
<DataGridTextColumn Binding="{Binding XPath=@CustomerID}"
Header="CustomerID"/>
<DataGridTextColumn Binding="{Binding XPath=@Name}"
Header="Name"/>
<DataGridTextColumn Binding="{Binding XPath=@City}"
Header="City"/>
</DataGrid.Columns>
</DataGrid>

<StackPanel Orientation="Vertical" Grid.Row="1">
<StackPanel Orientation="Horizontal">
<TextBlock Text="Order No."/>
<TextBox Text="{Binding XPath=OrderNo}" Width="83" />
</StackPanel>
<StackPanel Orientation="Horizontal">
<TextBlock Text="Product Name"/>
<TextBox Text="{Binding XPath=ProductName}"/>
</StackPanel>
<StackPanel Orientation="Horizontal">
<TextBlock Text="Product Price"/>
<TextBox Text="{Binding XPath=Price}"/>
</StackPanel>
<StackPanel Orientation="Horizontal">
<Image Source="{Binding XPath=Picture}" Height="100"
Width="200"/>
</StackPanel>
</StackPanel>
If you observe, the DataGrid property ‘IsSynchronizedWithCurrentItem’ is set to true. This means, when we make a choice of the DataGrid row, the corresponding item will be shown below as a details view in the TextBox control. It will also show an image of the product in an Image control.
Now when you run the project and select any row of the DataGrid, the output will look similar to the following –
WPF 4 DataGrid: Delete Multiple Rows
This article has been guest blogged by Mahesh Sabnis.
The WPF DataGrid has really got me interested to develop line-of-Business application, and I continue using it in different implementations. Read more at WPF: Two way TextBox Binding and WPF 4: Using ObjectDataProvider for DataBinding.
The WPF DataGrid has really got me interested to develop line-of-Business application, and I continue using it in different implementations. Read more at WPF: Two way TextBox Binding and WPF 4: Using ObjectDataProvider for DataBinding.
One important observation is that when we use this WPF DataGrid for application development and data representation, there are many occasions where you have to use it for Data manipulations too. In this article, I will demonstrate how to delete multiple rows from the WPF DataGrid.
WPF DataGrid allows us to use inbuilt column types and also allows us to define template columns using various WPF elements e.g. the ComboBox, Image etc. One of the default column template type provided to us, is the CheckBox column. In this article, I have used the same for multiple rows delete from a DataGrid.
Step 1: Create a WPF application and define the following classes in it:

The above classes represent Employee entity and Data Collection.
Step 2: In the MainWindow.xaml, define the following XAML code:
<Window x:Class="WPF_Application.MainWindow"
        xmlns="http://schemas.microsoft.com/winfx/2006/xaml/presentation"
        xmlns:x="http://schemas.microsoft.com/winfx/2006/xaml"
        Title="MainWindow DeleteMultipleRows" Height="426" Width="740"
         Loaded="Window_Loaded">

<Grid>
   <TextBlock Height="51" HorizontalAlignment="Left" Margin="37,12,0,0"
       Name="textBlock1" Width="648"
              Text="Employee Information System" VerticalAlignment="Top"
       TextAlignment="Center" FontSize="26" />
   <DataGrid AutoGenerateColumns="False" Height="240"
HorizontalAlignment="Left" Width="648"
              Margin="37,69,0,0" Name="dgEmp" VerticalAlignment="Top"
              ColumnWidth="*" RowEditEnding="dgEmp_RowEditEnding" >
   <DataGrid.Columns>
   <DataGridTextColumn Binding="{Binding EmpNo}" Header="EmpNo" />
   <DataGridTextColumn Binding="{Binding EmpName}" Header="EmpName" />
<DataGridTextColumn Binding="{Binding Designation}" Header="Desig" />
   <DataGridTextColumn Binding="{Binding Salary}" Header="Salary" />
   <DataGridCheckBoxColumn Header="Delete"></DataGridCheckBoxColumn>
   </DataGrid.Columns>
   </DataGrid>
   <Button Content="Delete Rows" Height="23" HorizontalAlignment="Left"
Margin="37,327,0,0"
                Name="btnDeleteRows" VerticalAlignment="Top" Width="190"
Click="btnDeleteRows_Click" />
</Grid>
</Window>
The above XAML code defines a DataGrid with various columns bound to the ‘Employee’ class properties. Notice that the DataGrid also defines the ‘DataGridCheckBoxColumn’. We will be using the same checkbox for deleting rows from the DataGrid. To complete the Delete operation, the XAML code also defines a Button element called btnDelete. The DataGrid subscribes to the ‘RowEditing’ event. This event will be raised when the CheckBox is checked in the CheckBoxColumn and control is shifted to the next row.
Step 3: Open MainWindow.xaml.cs and write the following code:
Define following at class level:
List<int> lstSelectedEmpNo;
EmployeeCollection EmpCollection = new EmployeeCollection();
In the loaded event, write the following code:
private void Window_Loaded(object sender, RoutedEventArgs e)
{
dgEmp.ItemsSource = EmpCollection;
lstSelectedEmpNo = new List<int>();
}
The code shown above binds the Employee collection to the DataGrid.
Write the following code in the RowEditing event:
private void dgEmp_RowEditEnding(object sender,
DataGridRowEditEndingEventArgs e)
{
FrameworkElement element = dgEmp.Columns[4].GetCellContent(e.Row);
if (element.GetType() == typeof(CheckBox))
{
if (((CheckBox)element).IsChecked == true)
{
FrameworkElement cellEmpNo =
dgEmp.Columns[0].GetCellContent(e.Row);
int EmpNo = Convert.ToInt32(((TextBlock)cellEmpNo).Text);
lstSelectedEmpNo.Add(EmpNo);
}
}
}
The above code reads the content of the fourth column of the DataGrid (the CheckBoxColumn). If the checkbox is checked, then for the selected row of the checked check box, the EmpNo is read and it is added to the ‘lstSelectedEmpNo’ List<T>.
Write the following code in the button ‘Delete Rows’ Click event:
private void btnDeleteRows_Click(object sender, RoutedEventArgs e)
{
try
{
if(lstSelectedEmpNo.Count>0)
{
int count=0;
foreach (int eno in lstSelectedEmpNo)
{
Employee emp = (from ep in EmpCollection
where ep.EmpNo == eno
select ep).First();
EmpCollection.Remove(emp);
count++;
}
MessageBox.Show(count + "Row's Deleted" );
}
}
catch (Exception ex)
{
MessageBox.Show(ex.Message);
}
}
The above code deletes the selected EmpNo from the collection.
Step 4: Run the application and the result will as shown below:

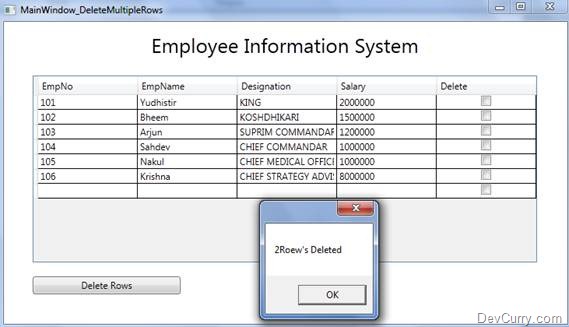
Select check-boxes of the rows you want to delete

Now click on the ‘Delete Rows’ button, the following result will be displayed:
WPF 4: Using ObjectDataProvider for DataBinding
Windows Presentation Foundation (WPF) has provided many features for developing Data Driven applications. Using the DataBinding feature of WPF, effective data representation can easily be achieved. WPF allows developers to define an instance of the Data Access Object directly in XAML. ObjectDataProvider is one of the effective mechanisms for DataBinding in WPF. We use this provider if the application contains a separate Data Access Layer. ObjectDataProvider defines the instance of the class and makes call to the various methods of the class. Follow these steps to use the ObjectDataProvider for Databinding in WPF applications
Step 1: In VS 2010, create a WPF application and name it as ‘WPF40_Database’. To this application, add a new class file and name it as ‘DataAccessLayer.cs’. Write the following code in it:
Note: To reduce code, I haven’t used the try-catch-finally block but make sure you do that in your application. Alternatively use the using block to release resources, once they are used.
using System;
using System.Collections.ObjectModel;
using System.Data.SqlClient;

namespace WPF40_Database
{
    public class ImageEmployee
    {
        public int EmpNo { get; set; }
        public string EmpName { get; set; }
        public int Salary { get; set; }
        public int DeptNo { get; set; }
        public byte[] EmpImage { get; set; }
    }

    public class CDataAccess
    {
        ObservableCollection<ImageEmployee> _EmpCollection;

        public ObservableCollection<ImageEmployee> EmpCollection
        {
            get { return _EmpCollection; }
            set { _EmpCollection = value; }
        }

        public CDataAccess()
        {
            _EmpCollection = new ObservableCollection<ImageEmployee>();
        }

        public ObservableCollection<ImageEmployee> GetEmployees()
        {
            SqlConnection conn =
            new SqlConnection("Data Source=.;Initial Catalog=Company;" +
                                "Integrated Security=SSPI");
            SqlCommand cmd = new SqlCommand();
            conn.Open();
            cmd.Connection = conn;
            cmd.CommandText = "Select * from ImageEmployee";

            SqlDataReader reader = cmd.ExecuteReader();
            while (reader.Read())
            {
                EmpCollection.Add(
                    new ImageEmployee()
                    {
                        EmpNo = Convert.ToInt32(reader["EmpNo"]),
                        EmpName = reader["EmpName"].ToString(),
                        Salary = Convert.ToInt32(reader["Salary"]),
                        DeptNo = Convert.ToInt32(reader["DeptNo"]),
                        EmpImage = (byte[])reader["EmpImage"]
                    });
            }
            reader.Close();
            conn.Close();
            return EmpCollection;
        }
    }
}
The above code contains two classes ‘ImageEmployee’ - which defines properties compatible to the Table column and the class ‘CDataAccess’, with a method called ‘GetEmployees()’ which makes a call to the database and retrieves rows from the table. The code in this method stores all the data in an ObservableCollection<T>.
Step 2: Open MainWindow.xaml and write the following XAML code:
<Window x:Class="WPF40_Database.MainWindow"
        xmlns="http://schemas.microsoft.com/winfx/2006/xaml/presentation"
        xmlns:x="http://schemas.microsoft.com/winfx/2006/xaml"
        xmlns:data="clr-namespace:WPF40_Database"
        Title="MainWindow" Height="350" Width="912">
    <Window.Resources>
        <ObjectDataProvider x:Key="objDs"
                             ObjectType="{x:Type data:CDataAccess}"
                             MethodName="GetEmployees">
        </ObjectDataProvider>

        <DataTemplate x:Key="EmpDataTemplate">
            <StackPanel Orientation="Horizontal">
              <TextBlock Text="{Binding EmpName}"></TextBlock>
              <Image Source="{Binding EmpImage}"  Height="60" Width="60"/>
            </StackPanel>
        </DataTemplate>

    </Window.Resources>
    <Grid DataContext="{Binding Source={StaticResource objDs}}">
     <ComboBox Height="80" HorizontalAlignment="Left" Margin="29,30,0,0"
                  Name="lstEmployee" VerticalAlignment="Top" Width="274"
                  ItemsSource="{Binding}"
                 ItemTemplate="{StaticResource EmpDataTemplate}"
                   IsSynchronizedWithCurrentItem="True"/>
     <TextBox Height="23" HorizontalAlignment="Left" Margin="688,70,0,0"
                 Name="textBox1" VerticalAlignment="Top" Width="120"
                  Text="{Binding EmpNo}"/>
     <TextBox Height="23" HorizontalAlignment="Left" Margin="688,114,0,0"
                 Name="textBox2" VerticalAlignment="Top" Width="120"
                 Text="{Binding EmpName}"/>
     <TextBox Height="23" HorizontalAlignment="Left" Margin="688,160,0,0"
                 Name="textBox3" VerticalAlignment="Top" Width="120"
                 Text="{Binding Salary}"/>
     <TextBox Height="23" HorizontalAlignment="Left" Margin="688,204,0,0"
                 Name="textBox4" VerticalAlignment="Top" Width="120"
                 Text="{Binding DeptNo}"/>
     <Image Height="66" HorizontalAlignment="Left" Margin="688,233,0,0"
               Name="image1"
               Stretch="Fill" VerticalAlignment="Top" Width="120"
                Source="{Binding EmpImage}"/>
     <TextBlock Height="23" HorizontalAlignment="Left" Margin="487,70,0,0"
                  Name="textBlock1" Text="EmpNo" VerticalAlignment="Top"
                   Width="169" />
    <TextBlock Height="23" HorizontalAlignment="Left" Margin="487,117,0,0"
                  Name="textBlock2" Text="EmpName" VerticalAlignment="Top"
                   Width="169" />
    <TextBlock Height="23" HorizontalAlignment="Left" Margin="487,163,0,0"
                  Name="textBlock3" Text="Salary" VerticalAlignment="Top"
                   Width="169" />
    <TextBlock Height="23" HorizontalAlignment="Left" Margin="487,207,0,0"
                  Name="textBlock4" Text="DeptNo" VerticalAlignment="Top"
                   Width="169" />
    </Grid>
</Window>
The above code defines ObjectDataProvider with key ‘objDs’ in Windows Resources. This creates an instance of the ‘CDataAccess’ class using ‘ObjectType’ attribute of the ObjectDataProvider, and using MethodName attribute, the ‘GetEmployees’ method from the ‘CDataAccess’ class is specified. The DataTemplate ‘EmpDataTemplate’ defines the Visual Structure for Data representation. The ObjectDataProvider ‘objDs’ is bound with the Grid. The DataTemplate ‘EmpDataTemplate’ is assigned to the ‘ItemTemplate’ property of the Combobox. The individual TextBox is bound with the property from the ‘ImageEmployee’ property.
Step 3: Run the application and the following result will be displayed. Select any value from the Combobox and the respective details will be displayed in the TextBoxes.

Subscribe to:
Posts (Atom)