Windows 8 also comes with various extensibility points, referred to as the ‘Charms’ that can be accessed programmatically in the Windows 8 Store Apps. These extension points, help applications interchange data via OS level interfaces. For example you can share information with another app via the ‘Share Charm’. You can refer to my previous article on Share Charms posted here.
Selecting Contacts using the Contact Picker
When building your own Windows 8 Store apps, you can use some of these applications for your specific needs too. Today we will see one such example where you can pick some of the contacts in your contacts list that can eventually be shared through the mail application.In this walkthrough, we will see how to use the Contact Picker and select single or multiple contacts.
The Walkthrough
The Contact application on the Windows 8 synchronizes with your contacts on Windows Live, Facebook, and Linkedin etc. To display the ContactPicker, the below class is used:Windows.ApplicationModel.Contacts.ContactPicker
The contact information selected using the contact picker is available through the ‘ContactInformation’ class. This class provides properties like, Name, PhoneNumbers, and Emails etc. This class also provides ‘GetThumbNailAsync()’ method using which the contact image can be extracted.
Though the current example is in C# + XAML, you have access to the ContactPicker when building Windows 8 Store Apps via JavaScript too.
Step 1: Open Visual Studio 2012 and create a new Windows Store application, name it as ‘Store_CS_WorkingwithContacts’.
Step 2: In this project add a class, name it as ‘ContactDetails’. Define the class as below:
/// <summary>
/// Class to Display Contact Details
/// This class is used to read the imformation of the selected contact(s)
/// </summary>
public class ContactDetails
{
public string ContactName { get; private set; }
public BitmapImage ContactImage { get; private set; }
//The boolean property used to decide wheather to display the PhoneNo and Email List
//based upon the availabe infiormation in the contact
public Visibility CanShow { get; set; }
public List<string> PhoneNumbers { get; set; }
public List<string> ContactEmails { get; set; }
public ContactDetails(ContactInformation c)
{
PhoneNumbers = new List<string>();
ContactEmails = new List<string>();
CanShow = Visibility.Visible;
ContactName = c.Name;
if (c.PhoneNumbers.Count > 0)
{
foreach (var item in c.PhoneNumbers)
{
PhoneNumbers.Add(item.Value);
}
}
else
{
CanShow = Visibility.Collapsed;
}
if (c.Emails.Count > 0)
{
foreach (var item in c.Emails)
{
ContactEmails.Add(item.Value);
}
}
else
{
CanShow = Visibility.Collapsed;
}
GetContactImage(c);
}
/// <summary>
/// The method whihc read the Contact Image
/// </summary>
/// <param name="c"></param>
async void GetContactImage(ContactInformation c)
{
var imgStream = await c.GetThumbnailAsync();
ContactImage = new BitmapImage();
if (imgStream != null && imgStream.Size > 0)
{
ContactImage.SetSource(imgStream);
}
}
}
The above class defines properties, these are used to display details of the selected contact in the UI. In the above class properties PhoneNumbers and ContactEmails will display the multiple contact numbers and emails against one contact.
Step 3: Add the below XAML in MainPage.xaml:
<Page.Resources>
<DataTemplate x:Key="contactTemplate">
<Grid Width="598" Height="300" >
<Grid.ColumnDefinitions>
<ColumnDefinition Width="299"></ColumnDefinition>
<ColumnDefinition Width="299"></ColumnDefinition>
</Grid.ColumnDefinitions>
<Grid.RowDefinitions>
<RowDefinition Height="75"></RowDefinition>
<RowDefinition Height="75"></RowDefinition>
<RowDefinition Height="75"></RowDefinition>
<RowDefinition Height="75"></RowDefinition>
</Grid.RowDefinitions>
<TextBlock Grid.Column="0" Grid.Row="0" Text="Name"></TextBlock>
<TextBlock Grid.Column="1"
Grid.Row="0"
Text="{Binding ContactName}"></TextBlock>
<TextBlock Grid.Column="0"
Grid.Row="1"
Text="Contact Number"
Visibility="{Binding CanShow}"></TextBlock>
<ListBox Grid.Column="1"
Grid.Row="1"
ItemsSource="{Binding PhoneNumbers}"
Visibility="{Binding CanShow}"></ListBox>
<TextBlock Grid.Column="0"
Grid.Row="2"
Text="Email"
Visibility="{Binding CanShow}"></TextBlock>
<ListBox Grid.Column="1"
Grid.Row="2"
ItemsSource="{Binding ContactEmails}"
Visibility="{Binding CanShow}"></ListBox>
<TextBlock Grid.Column="0"
Grid.Row="3" Text="Image"></TextBlock>
<Image Grid.Column="1" Grid.Row="3"
Source="{Binding ContactImage}"></Image>
</Grid>
</DataTemplate>
</Page.Resources>
<Grid Background="{StaticResource ApplicationPageBackgroundThemeBrush}">
<Button x:Name="btnCallContact" Content="Load Contact View" HorizontalAlignment="Left" Margin="49,118,0,0" VerticalAlignment="Top" Width="268" Height="74" FontSize="22" Click="btnCallContact_Click"/>
<RadioButton x:Name="rdsingleview" Content="Single Contact" HorizontalAlignment="Left" Margin="49,260,0,0" VerticalAlignment="Top" Width="268" Height="53" Click="rdsingleview_Click"/>
<RadioButton x:Name="rdmultipleview" Content="Mumtiple Contact" HorizontalAlignment="Left" Margin="49,342,0,0" VerticalAlignment="Top" Width="268" Height="65" Click="rdmultipleview_Click"/>
<ListView x:Name="lstcontactsdetails"
HorizontalAlignment="Left" Height="537"
Margin="539,106,0,0" VerticalAlignment="Top" Width="600"
ItemTemplate="{StaticResource contactTemplate}"/>
<TextBlock x:Name="txtmessage" HorizontalAlignment="Left" Height="82" Margin="49,443,0,0" TextWrapping="Wrap" VerticalAlignment="Top" Width="550" FontFamily="Segoe UI" FontSize="42"/>
<TextBlock HorizontalAlignment="Left" Margin="49,34,0,0" TextWrapping="Wrap" Text="The Contact Selector" VerticalAlignment="Top" Height="72" Width="1267" FontFamily="Segoe UI" FontSize="45" Foreground="#FFC0C382" FontWeight="Bold"/>
</Grid>
The XAML contains button which on click will show the ContactPicker UI, the radio buttons will be used to decide about the selection on Single or Multiple contacts. The ListView will display the contact selected by the user. The DataTemplate define the Grid layout for displaying the contact details.
Step 4: Define the following collection types on the MainPage class level:
string selectionType = "";
/// <summary>
/// The Selected Contacts
/// </summary>
IReadOnlyList<ContactDetails> _ContactDetails;
public IReadOnlyList<ContactDetails> ContactDetails
{
get { return _ContactDetails; }
set { _ContactDetails = value; }
}
/// <summary>
/// List of Contact Details use to display in UI
/// </summary>
List<ContactDetails> _SingleContactDetails;
public List<ContactDetails> SingleContactDetails
{
get { return _SingleContactDetails; }
set { _SingleContactDetails = value; }
}
Step 5: Add the following code in the click event of radio buttons:
private void rdsingleview_Click(object sender, RoutedEventArgs e)
{
selectionType = "Single";
}
private void rdmultipleview_Click(object sender, RoutedEventArgs e)
{
selectionType = "Multiple";
}
Step 6: In the MainPage.xaml.cs, add the following code in the click event of the ‘Load Contact View’ button.
/// <summary>
/// The click Event. This event will decide wheather to allow Single contact pick or allow used to select multiple
/// contacts.
/// </summary>
/// <param name="sender"></param>
/// <param name="e"></param>
private async void btnCallContact_Click(object sender, RoutedEventArgs e)
{
SingleContactDetails = new List<Store_CS_WorkingwithContacts.ContactDetails>();
var contactSelector = new Windows.ApplicationModel.Contacts.ContactPicker();
//Set the text for the commit button of the ContactPicker UI
contactSelector.CommitButtonText = "Pick Contact";
if (selectionType == "Single")
{
//Select Single Contact
var selectedContact = await contactSelector.PickSingleContactAsync();
SingleContactDetails.Add(new ContactDetails(selectedContact));
}
else
{
if (selectionType == "Multiple")
{
//Select Multiple Contacts
var selectedContact = await contactSelector.PickMultipleContactsAsync();
foreach (var item in selectedContact)
{
SingleContactDetails.Add(new ContactDetails(item));
}
}
else
{
txtmessage.Text = "Please Select the option";
}
}
lstcontactsdetails.ItemsSource = SingleContactDetails;
}
The above code, creates an instance of the ‘ContactPicker’ class and sets its commit button’s Text to ‘Pick Contact’. Then based upon the user selection, it calls the ‘PickSingleContactAsync()’ method for selecting single contact or ‘PickMultipleContactsAsync()’ method to allow user to have multiple selection.
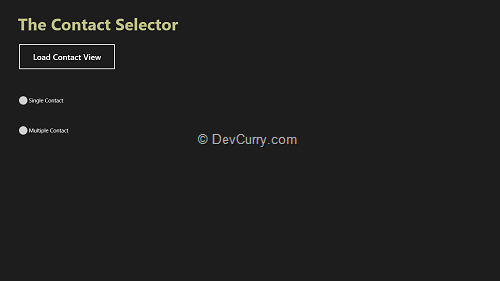
Step 7: Run the application, the UI will be as below

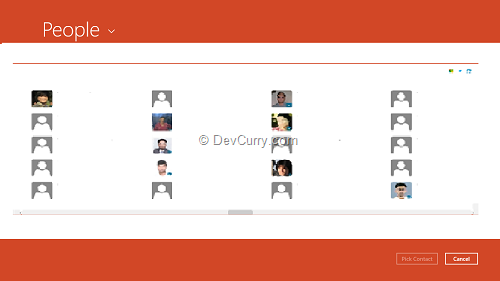
Select ‘Single Contact’ or ‘Multiple Contact’ using the radio buttons. All your Contacts from the People app will show up.

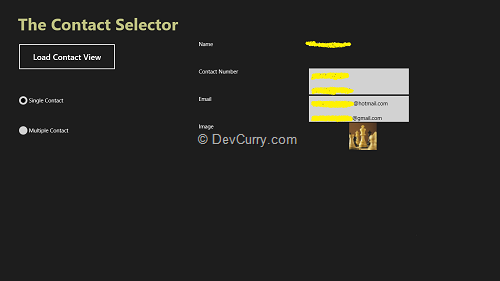
Note: Images and Contact details have been obfuscated here.
The Commit Button shows the ‘Pick Contact’ text. Select the contact and click on the ‘Pick Contact’ button to import the relevant contact information into your application:

Now you can share the contact info with other applications via the Share charm if require.
Please visit here for using share charm.
Conclusion
The Contact Picker control allows you to import contact information into your own app, from the People app. This information can be further used to send mails etc.Download the entire source code (GitHub)
Tweet


No comments:
Post a Comment