Let’s get started. Open Visual Studio 2010/2012 and create a blank ASP.NET Website. Now add a page ‘default.aspx’ to the site. Set it’s target schema for validation as HTML 5 by going to Tools > Options > Text Editor > HTML > Validation. If you do not see the HTML 5 option, make sure you have installed Visual Studio 2010 Service Pack 1and Web Standards Update for Microsoft Visual Studio 2010 SP1.
Declare a HTML 5 canvas element of dimensions 400x400, add a Save button and an ASP.NET Image element to the form.
<form id="form1" runat="server">
<div>
<canvas id="canasp" width="100" height="100">
</canvas><br />
<asp:Image ID="imgASP" runat="server"/>
<asp:Button ID="btnSave" runat="server" Text="Save Image">
</asp:Button>
</div>
</form>
We will draw some simple rectangles on this canvas using two functions – fillStyle and fillRect
fillRect(float x, float y, float w, float h) – where x & y represent the upper-left corner of the rectangle and w & h represent the width and height of the rectangle you want.
fillStyle = “rgba(R, G, B, V)” - we will fill color in this rectangle by using the fillStyle attribute. As you might have guessed, the RGB stand for red, green, and blue values (0–255) of the color you’re creating. ‘V’ represents the visibility factor 0 & 1, where 0 indicates invisibility, and 1 indicates visibility.
To draw graphics on a Canvas, you require a JavaScript API that HTML 5 provides. We will be using jQuery to do our client script. Declare the following JavaScript code inside the <head> element of your page
<script src="https://ajax.googleapis.com/ajax/libs/jquery/1.9.0/jquery.min.js"></script>
<script type="text/javascript">
$(function () {
var canvas = document.getElementById('canasp');
var context = canvas.getContext('2d');
});
</script>
Note: $(function(){} ensures that code is run only after the Canvas element is fully loaded by the browser. This is better than built-in Javascript event
window.onload which has some quirks across browsers (FF/IE6/IE8/Opera) and waits for the entire page, including images to be loaded.We get a reference to the Canvas from the DOM by using getElementById (you can use jQuery code too, but I will stick to the old getElementById for now). We then ask the Canvas to give us a context to draw on. This is done by using the variable context that sets a reference to the 2D context of the canvas, which is used for all drawing purposes.
We will now use the fillRect() and fillStyle() function to draw two rectangles. Add this code below the context code
context.fillStyle = "rgba(156, 170, 193, 1)";
context.fillRect(30, 30, 70, 90);
context.fillStyle = "rgba(0, 109, 141, 1)";
context.fillRect(10, 10, 70, 90);
The code is pretty simple. We are passing some RGB values and drawing rectangles of width 70 px and height 90px. Check the definition above for fillStyle and fillRect to understand the code better.
Browse the page and you have two rectangles similar to the following:

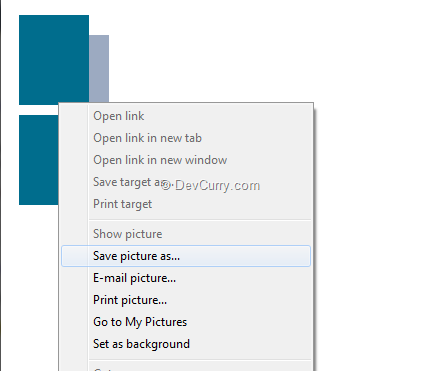
If you want to save this drawing, you will have to set the source of an image object to the canvas data. From there, a user can right click on the image to save it to their local computer.
Saving Canvas Images to an ASP.NET Image Object
It’s time to persist this masterpiece on your disk. To do so, we will use the Canvas element’s toDataURL() method that returns a Base64-encoded string of the current pixels in the Canvas element. We will then set this string to the ASP.NET Image object source. Simple! Write the following code on the Save button click$("#btnSave").on('click', function (e) {
e.preventDefault();
var imgData = canvas.toDataURL();
//alert(imgData);
$("#<%=imgASP.ClientID %>")
.attr("src", imgData)
});
Run the code and hit Save. Now you will be able to save the image to your disk

A better way would be to be able to save the image directly to your server or your database. We will see how to do this in an upcoming article using jQuery.ajax and web methods.
The entire source code of this article can be downloaded at https://github.com/devcurry/save-canvas-image
Tweet


2 comments:
Come sempre manca un pezzo!!! Come si salva l'immagine lato server?!?
A couple things were missing from the JS function. Here is the corrected code:
$(function () {
$("#btnSave").on('click', function (e) {
e.preventDefault();
var imgData = canasp.toDataURL();
//alert(imgData);
$("#<%=imgASP.ClientID %>")
.attr("src", imgData)
})
});
Post a Comment