The requirement was to display all records in an HTML table, and allow users to add a new row as well as Edit and Delete records. In essence, functionality similar to like what we used to do earlier in ASP.NET GridView, but it had to be done in an ASP.NET MVC application preferably without un-necessary postbacks.
In this sample today, we’ll look at how we can implement this behavior in an MVC 4 application.
The Sample Web API and KnockOut Application
Step 1: Open VS 2012 and create a new MVC 4 application using the Empty project template and name it as ‘MVC40_Editable_Table’.Once the solution is ready, add the jQuery and Knockout libraries using NuGet package manager. You can also install them from the Package Manager Console using the following commands
PM> install-package jquery –version 1.9.1
PM> install-package knockoutjs
Step 2: In the App_Data folder, add a new SQL Server Database, name it as Application.mdf. Open this Database in the Server Explorer by double clicking on it and add the new table of Name EmployeeInfo in it. The script is as below:
CREATE TABLE [dbo].[EmployeeInfo] (
[EmpNo] INT IDENTITY (1, 1) NOT NULL,
[EmpName] VARCHAR (50) NOT NULL,
[DeptName] VARCHAR (50) NOT NULL,
[Designation] VARCHAR (50) NOT NULL,
[Salary] DECIMAL (18) NOT NULL,
PRIMARY KEY CLUSTERED ([EmpNo] ASC)
);
Step 3: Build the project. In this project, add a new ADO.NET EF in the Models folder name it as ‘ApplicationEntities.edmx’.
- In the wizard, select the Application.mdf database as created in Step 1.
- Select the EmployeeInfo table created in Step 2.
- You can keep all other defaults as is.
After completion of the wizard, the following mapping will be displayed:
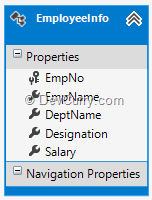
Step 4: Build the project. In the Controllers folder, add a new API Controller based upon the ADO.NET EF entity just added in the Step 3. Name it as ‘EmployeeInfoAPIController’. Here you will get all the methods mapped to HTTP GET, POST, PUT and DELETE.
Step 5: Add a new Empty MVC Controller in the Controllers folder of name EmployeeInfo. Here you will get an Index action method. Add a new (Index) view in the application using the Index action method. Here you will get Index.cshtml.
Step 6: In the Index.cshtml add the below styles:
<style type="text/css">
table {
width:700px;
border:double;
}
th {
width:100px;
}
td {
border:double;
width:100px;
}
input {
width:100px;
}
</style>
Refer the Script libraries for jQuery and Knockout as shown below in the view:
<script src="~/Scripts/jquery-2.0.0.min.js"></script>
<script src="~/Scripts/knockout-2.2.1.js"></script>
On the view, add the following script
<script type="text/javascript">
var self = this;
//S1:Boolean to check wheather the operation is for Edit and New Record
var IsNewRecord = false;
self.Employees = ko.observableArray([]);
loadEmployees();
//S2:Method to Load all Employees by making call to WEB API GET method
function loadEmployees() {
$.ajax({
type: "GET",
url: "api/EmployeeInfoAPI"
}).done(function (data)
{
alert("Success");
self.Employees(data);
}).fail(function (err)
{
alert(err.status + " <--------------->");
});
};
alert("Loading Data");
//S3:The Employee Object
function Employee(eno, ename, dname, desig, sal) {
return {
EmpNo: ko.observable(eno),
EmpName: ko.observable(ename),
DeptName: ko.observable(dname),
Designation: ko.observable(desig),
Salary: ko.observable(sal)
}
};
//S4:The ViewModel where the Templates are initialized
var EmpViewModel = {
readonlyTemplate:ko.observable("readonlyTemplate"),
editTemplate:ko.observable()
};
//S5:Method to decide the Current Template (readonlyTemplate or editTemplate)
EmpViewModel.currentTemplate = function (tmpl) {
return tmpl === this.editTemplate() ? 'editTemplate' :
this.readonlyTemplate();
}.bind(EmpViewModel);
//S6:Method to create a new Blank entry When the Add New Record button is clicked
EmpViewModel.addnewRecord = function () {
alert("Add Called");
self.Employees.push(new Employee(0, "", "", "", 0.0));
IsNewRecord = true; //Set the Check for the New Record
};
//S7:Method to Save the Record (This is used for Edit and Add New Record)
EmpViewModel.saveEmployee = function (d) {
var Emp = {};
Emp.EmpNo = d.EmpNo;
Emp.EmpName = d.EmpName;
Emp.DeptName = d.DeptName;
Emp.Designation = d.Designation;
Emp.Salary = d.Salary;
//Edit the Record
if (IsNewRecord === false) {
$.ajax({
type: "PUT",
url: "api/EmployeeInfoAPI/" + Emp.EmpNo,
data: Emp
}).done(function (data)
{
alert("Record Updated Successfully " + data.status);
EmpViewModel.reset();
}).fail(function (err)
{
alert("Error Occured, Please Reload the Page and Try Again " + err.status);
EmpViewModel.reset();
});
}
//The New Record
if (IsNewRecord === true)
{
IsNewRecord = false;
$.ajax({
type: "POST",
url: "api/EmployeeInfoAPI",
data: Emp
}).done(function (data)
{
alert("Record Added Successfully " + data.status);
EmpViewModel.reset();
loadEmployees();
}).fail(function (err)
{
alert("Error Occures, Please Reload the Page and Try Again " + err.status);
EmpViewModel.reset();
});
});
}
};
//S8:Method to Delete the Record
EmpViewModel.deleteEmployee = function (d) {
$.ajax({
type: "DELETE",
url: "api/EmployeeInfoAPI/" + d.EmpNo
}).done(function (data)
{
alert("Record Deleted Successfully " + data.status);
EmpViewModel.reset();
loadEmployees();
}).fail(function (err)
{
alert("Error Occures, Please Reload the Page and Try Again " + err.status);
EmpViewModel.reset();
});
};
//S9:Method to Reset the template
EmpViewModel.reset = function (t) {
this.editTemplate("readonlyTemplate");
};
ko.applyBindings(EmpViewModel);
</script> The above script performs the following operations:
· S1 defines the Flag IsNewrecord that checks whether the current action is for New Record or for Editing an existing record.
· S2 describes The loadEmployees method, makes an AJAX call to a WEB API service that reads and fetches all the Employee records. Once these are received on the client side, they are added to the Employees observableArray.
· S3 defines the client side Employee object and its fields. This is used to PUSH the new record to the Employees observableArray.
· S4 defines the EmpViewModel which used to initialize templates. The initial value is set for the readonlyTemplate.
· S5 The currentTemplate method is used to maintain the current template type (i.e. readOnly or Editable).
· S6: The addnewrecord method is used to push new Employee record in the Employees observableArray. This method also sets the IsNewRecord flag to true.
· S7: The saveEmployee method is used to either save New or Updated employee rows. This makes either an HTTP PUT or POST call to the WEB API based on the IsNewRecord flag value.
· S8: The deleteEmployee method is used to delete a record using and AJAX call to WEB API using HTTP DELETE verb.
· S9: The reset, method is used to reset the template to readonlyTemplate. This removes the Edit effect from the UI.
Step 7: Now we’ll add the following HTML markup to our Index.cshtml:
The Html input button which is bind with the addnewRecord function
<input type="button" value="Add New Record" data-bind="click: function () { EmpViewModel.addnewRecord(); }"/>
The Html Table is bound with the currentTemplate method and iterates through the Employees observableArray.
<table>
<thead>
<tr>
<th>EmpNo</th>
<th>EmpName</th>
<th>DeptName</th>
<th>Designation</th>
<th>Salary</th>
<th></th>
<th>
</th>
</tr>
</thead>
<tbody data-bind="template: { name: currentTemplate, foreach: Employees }"></tbody>
</table>
Step 8: The HTML template which will be used to show data either in Read-Only form or in Editable form uses the following markup:
<script type="text/html" id="readonlyTemplate">
@* <table>*@
<tr>
<td>
<span data-bind="text: EmpNo"></span>
</td>
<td>
<span data-bind="text: EmpName"></span>
</td>
<td>
<span data-bind="text: DeptName"></span>
</td>
<td>
<span data-bind="text: Designation"></span>
</td>
<td>
<span data-bind="text: Salary"></span>
</td>
<td>
<input type="button" value="Edit" data-bind="click: function () { EmpViewModel.editTemplate($data);}"/>
</td>
<td>
<input type="button" value="delete" data-bind="click: function () { EmpViewModel.deleteEmployee($data); }"/>
</td>
</tr>
@* </table>*@
</script>
<script type="text/html" id="editTemplate">
@* <table>*@
<tr>
<td>
<input type="text" data-bind="value: $data.EmpNo" id="txteno" disabled="disabled"/>
</td>
<td>
<input type="text" data-bind="value: $data.EmpName" id="txtename"/>
</td>
<td>
<input type="text" data-bind="value: $data.DeptName" id="txtdname"/>
</td>
<td>
<input type="text" data-bind="value: $data.Designation" id="txtdesig"/>
</td>
<td>
<input type="text" data-bind="value: $data.Salary" id="txtsal"/>
</td>
<td>
<input type="button" value="Save" data-bind="click: EmpViewModel.saveEmployee"/>
</td>
<td>
<input type="button" value="Cancel" data-bind="click: function () { EmpViewModel.reset(); }"/>
</td>
</tr>
@*</table>*@
</script>
The above two templates are bound with the Employee objects’ properties. The readonlyTemplate will be displayed in the HTML table by default. This template contains ‘Save’ and ‘Delete’ button. When the end-user clicks on the Save button for a specific row, the readonlyTemplate is replaced by editTemplate. Now the end-user can update the employee details and when the Save button is clicked, the record will be posted to the server.
That wraps our implementation, now let’s see how it looks.
The Demo
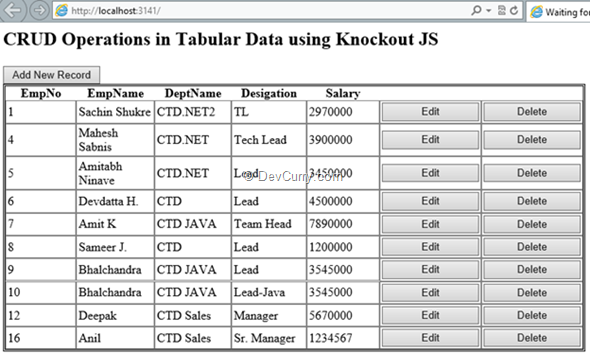
Run the application, you will be prompted with alert boxes which will intimate you about the ‘Loading Data’ and then ‘Success’. Press OK you will find the Table populated as below: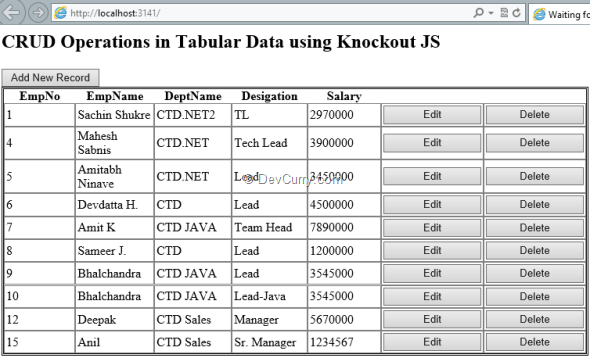
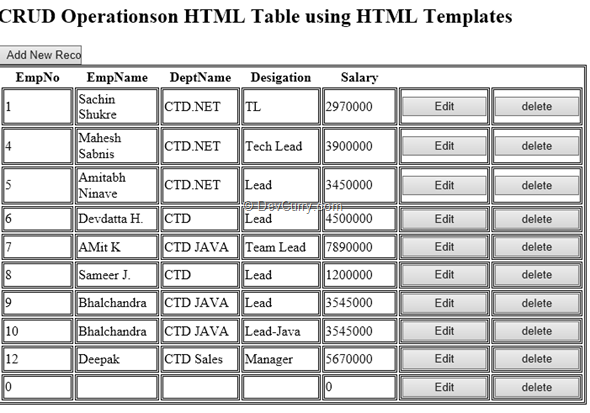
Click on ‘Add new Record’, you will find the new Row added at the bottom as below:
Now click on the ‘Edit’ button for the new added row, it will be editable as below:
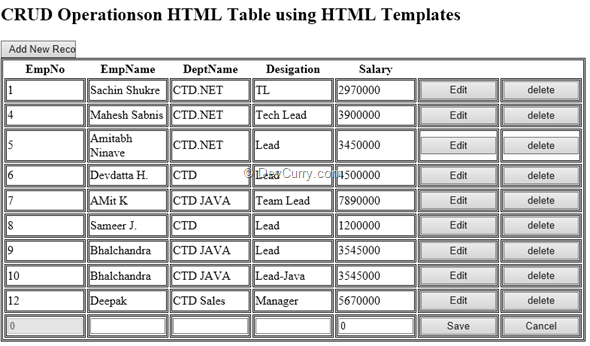
Here add values for EmpName, DeptName, Designation and Salary and click on Save the Record will be added and the result will be shown as below:
Similarly when you click on the Edit of the existing record, it will be converted into editable form as below: e.g. click on record with EmpNo 7, the result will be as below:
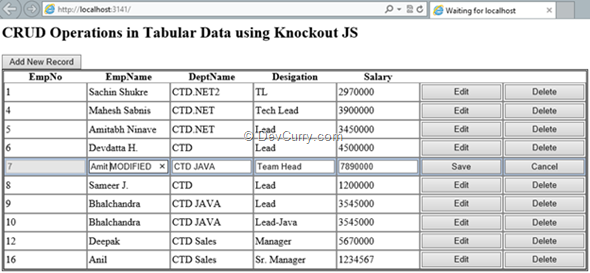
And you can change values of the row and click on ‘Save’, the record will get updated. Similarly you can test Delete as well.
Conclusion
We saw how to achieve client side interactivity for doing CRUD operations, inline, on Tabular Data. This is a common requirement in LoB applications and as we saw it’s rather easy to achieve using jQuery and Knockout JS.Download the entire source code of this article (Github)
Tweet


No comments:
Post a Comment